People
Customers
This is where a partner can view thier customers. A customer is the entity that is billed for the use of the Doover platform, and a customer can have multiple users.
List View Columns
- Name: The name of the customer
- Management Portal: A link to the management portal for the customer
List View Actions
- Delete selected customers: Deletes the selected customers
Item View Page
- General:
- Name: The name of the customer
- Management Portal: A link to the management portal for the customer
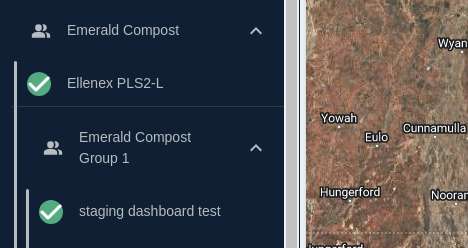
- Groups: On this tab, a partner can add sub-groups to the customer. This allows a partner to manage devices/dashboards for a given customer in a more organised manner. In the below example, a customer named Emerald Compost has a device called "Ellenex PLS2-L" and a sub-group called "Emerald Compost Group 1", which then has a dashboard called "staging dashboard test". Users can then be added to the sub-group, and given permissions to the devices/dashboards within the sub-group.
Invitations
Invitations are sent out to new users and from this section a partner can view all the invitations sent out to new users, as well as invite new users to the platform. Additionaly, the permissions assigned to the invited users can be managed from this section.
List View Columns
- User: The name of the user that was invited
- Organisation: The organisation the user belongs to
- Make them an Admin: Admin status of the user. Admin users can add or remove users from the platform
- Make them Read-Only: Read-Only status of the user. Read-Only users can view all the data in the platform, but cannot make any changes.
- Make them a Technician: Technician status of the user. Technicicans can add and manage devices, dashboards and Lora Gateways.
- Allow them to manage Billing: Allows the user to manage billing.
- Make them a Developer: The developer status of the user. Developers can manage the more technical aspects of the platform, such as adding new git repositories or new device applications.
List View Actions
- Delete selected invitations: Deletes the selected invitations
Item View Page
- Invitation Link: The link that was sent to the user to join the platform
- First Name: The first name of the user that was invited
- Last Name: The last name of the user that was invited
- Organisation: The organisation the user belongs to
- Make them an Admin: Admin status of the user. Admin users can add or remove users from the platform
- Make them Read-Only: Read-Only status of the user. Read-Only users can view all the data in the platform, but cannot make any changes.
- Make them a Technician: Technician status of the user
- Allow them to manage Billing: The ability to manage billing for the user
- Make them a Developer: The developer status of the user. Developers can manage the more technical aspects of the platform, such as adding new git repositories or new device applications.
Users
From this section, a partner can view and manage the details of users, as well as which organisations they belong to.
List View Columns
- Email address: The email address of the user
- First Name: The first name of the user
- Last Name: The last name of the user
- Phone Number: The phone number of the user
Item View Page
- General:
- Email address: The email address of the user
- First Name: The first name of the user
- Last Name: The last name of the user
- Phone Number: The phone number of the user
- Password: The password of the user
- Member Of: On this tab, users can be added or removed from organisations, and permissions can be assigned on a per organisation basis